
You set everything perfectly, export the file, send it to print… and then your edges come back with thin white lines. Looks amateur. Feels like you messed up.
You didn’t. You just missed one tiny detail printers never explain properly.
Let’s fix that.
The Short Answer (What You Actually Came For)
The standard bleed size in printing is 0.125 inches (1/8 inch) on all sides.
In metric terms: 3 mm bleed.
That’s it. That’s the industry standard across:
- Books
- Flyers
- Brochures
- Posters
- Packaging
If your document size is 6 x 9 inches, your file should actually be:
- 6.25 x 9.25 inches with bleed
What Bleed Actually Means (No Jargon)
Think of a printed page like cutting paper with scissors.
Now imagine the blade is slightly off by a hair (which happens every time in real printing).
If your design stops exactly at the edge, even a tiny shift = white edges.
So printers do this:
- They print slightly bigger than the final size
- Then trim it down
That extra area beyond the edge is called bleed
Bleed = extra design space that gets cut off
Why 0.125 Inches Specifically?
This isn’t random.
Commercial printing machines (guillotine cutters) have a tolerance of about:
- ±0.5 mm to ±1 mm
So the industry settled on 3 mm (0.125″) because:
- It safely absorbs cutting shifts
- It works across almost all machines globally
- It avoids visible white edges even with slight misalignment
Anything less? Risky.
Anything more? Usually unnecessary.
The #1 Mistake Everyone Makes
They add bleed… but don’t extend the design into it.
That’s useless.
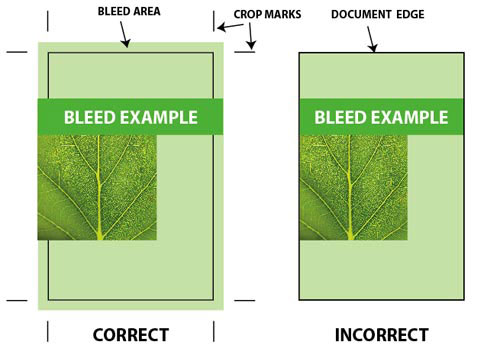
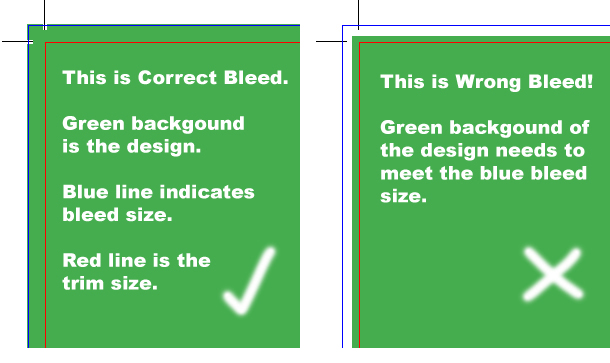
Your background, images, colors — everything that touches the edge — must bleed outward.
Wrong:
- Design stops at trim line
- Bleed area is empty
Correct:
- Design extends fully into bleed area
If you remember one thing:
👉 Bleed is not space. It’s overflow.
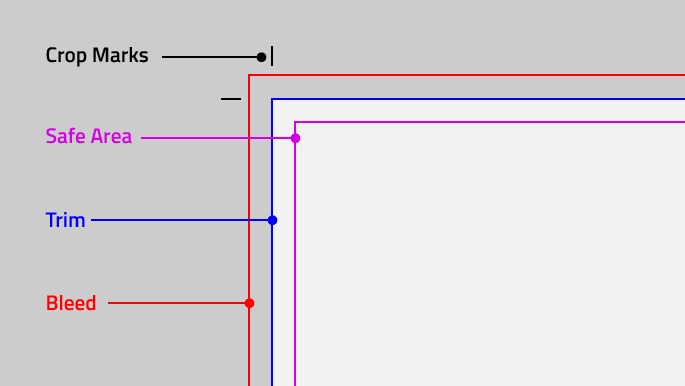
Trim Size vs Bleed vs Safe Area (This Is Where People Get Confused)
These three get mixed up constantly.
| Term | What it means | What you do |
|---|---|---|
| Trim Size | Final size after cutting | Your actual book/page size |
| Bleed | Extra outside area | Extend backgrounds into it |
| Safe Margin | Inner buffer zone | Keep text inside it |
Real Example (Book 6 x 9 inches):
- Trim: 6 x 9
- Bleed: 6.25 x 9.25
- Safe margin: ~0.25–0.5 inches inside
If text goes too close to the edge, even if bleed is correct, it can still get cut.
That’s a different problem.
The Simple Setup (Works Everywhere)
Doesn’t matter if you’re using:
- Adobe InDesign
- Adobe Illustrator
- Canva
- Microsoft Word
The logic is always the same:
Set this:
- Bleed: 0.125 in (3 mm)
- Extend all edge elements into bleed
- Keep text inside safe margin
That’s it.
Where Things Get Weird (Edge Cases I’ve Seen Too Many Times)
1. Amazon KDP users messing this up
With Amazon KDP:
- If you choose “bleed: yes”
→ you MUST follow their template exactly - If you choose “no bleed”
→ nothing should touch edges
Mixing the two? Instant rejection.
2. Printers asking for 0.25 inch bleed
Rare, but happens with:
- Large format printing
- Packaging
- Some US print shops
When that happens:
👉 Follow their spec, not the standard
3. Exporting PDF without bleed
Everything perfect… until export.
Common mistake:
- “Include bleed” checkbox not ticked
Result:
- Printer receives a clean edge file → white borders
Check this every time.
4. Canva users (this one hurts)
In Canva:
- There’s a “Show print bleed” toggle
- But it doesn’t automatically fix your design
You still need to manually extend elements.
Quick Self-Check (30 Seconds Before You Print)
Run this mental checklist:
- Background touches edge? → Extend it outward
- Export PDF? → Include bleed enabled
- Text near edge? → Pull it inward
- Printer specs checked? → Match their requirement
If all four are solid, you’re good.
The One Thing I Wish People Knew Earlier
Bleed doesn’t fix bad layout.
It only fixes cutting tolerance.
If your design is already tight, cramped, or hugging edges… bleed won’t save it.
Good print design always has:
- Breathing space inside
- Overflow outside
Both matter.
Still Seeing White Edges? Here’s What’s Actually Wrong
If bleed is correct but you still get issues, it’s usually one of these:
- PDF exported without bleed
- Printer scaled your file (huge red flag)
- Incorrect page size vs bleed size
- Design didn’t extend far enough
- Using “fit to page” in print settings
That last one ruins everything.
Final Reality Check
Most beginners think bleed is complicated.
It’s not.
It’s just this:
👉 Add 0.125 inches extra. Fill it. Let it get cut.
Once that clicks, you stop making amateur print files forever.